In the sprawling underworld of Star Wars Outlaws, every major syndicate guards its most prized possessions in heavily fortified vaults. For players venturing into the Hutt Cartel's territory on Tatooine, the ultimate prize lies within the Hutt Vault in Mos Eisley. Getting inside, however, is no walk in the park—it's a proper heist that requires cunning, stealth, and a trio of elusive keycards. This guide breaks down everything you need to know to pull off this caper successfully in 2026, from tracking down those keycards to navigating the vault's formidable defenses. Remember, your reputation with the Hutts is everything here; it can make this job a breeze or a total nightmare. Let's dive in.
Where to Find the Three Hutt Vault Keycards
First things first, you need the keys to the kingdom—or in this case, the vault. You'll need to collect three specific keycards, and you can grab them in any order you like. No pressure, right? Just know you need all three before you can even think about cracking that vault open.
Here's your shopping list:
-
Bib's Vault Keycard
-
Dokk's Vault Keycard
-
Garfalaquox's Vault Keycard
All three are stashed within Hutt Cartel territory, so your reputation with the slug-like gangsters is a major factor. If you're in their good books, you'll have a smoother ride. If you're on their naughty list... well, let's just say it'll be more of a challenge. 😅 Even with high rep, though, the restricted areas are strictly off-limits, so a bit of sneaking is always on the menu unless you want to burn those bridges.
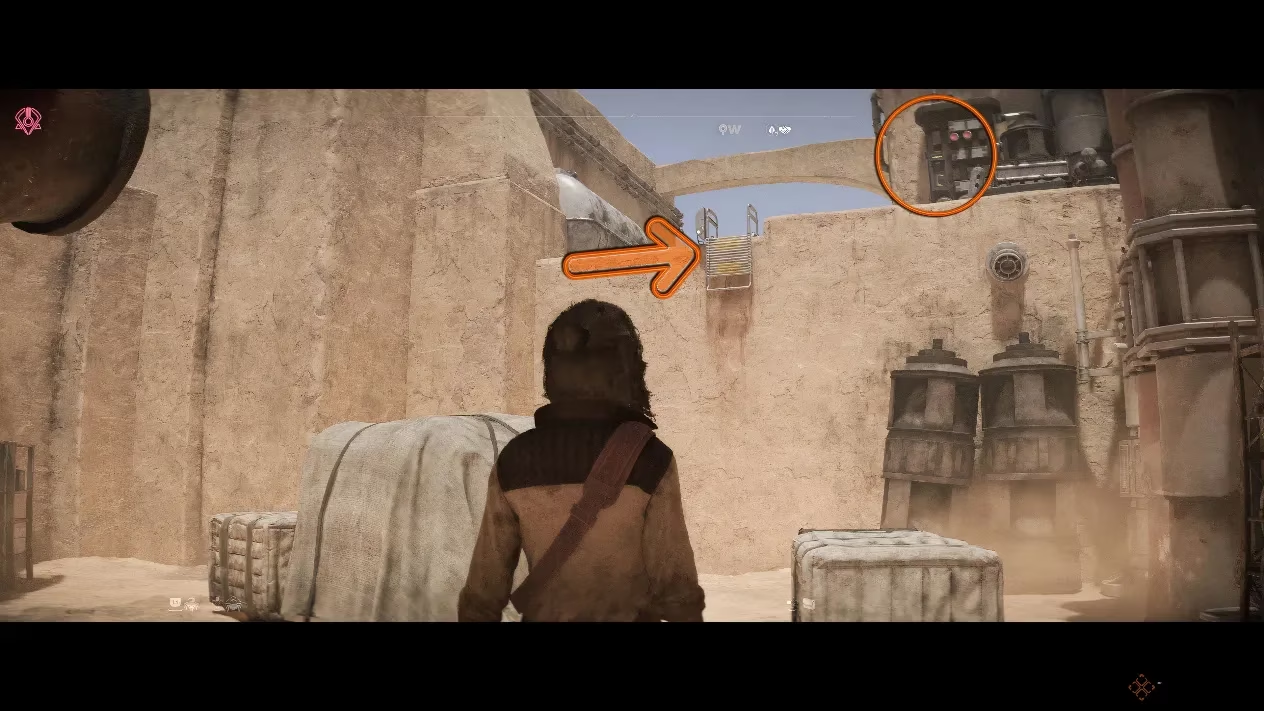
How to Get Bib's Vault Keycard
Bib's keycard is held at a Hutt Cartel checkpoint located northwest of Mos Eisley. It's less than a klick away, so a quick zoom on your speeder will get you there in no time.
Once you arrive, look for the biggest building sporting the iconic Hutt symbol on its wall. That's your target. The building has two entrances—one at the front and one on the left side—both secured with electronic locks that require your trusty data spike.
To avoid unwanted attention and a hit to your rep, we recommend a stealthy approach. Take out any guards who might be eyeballing the doors. Once the coast is clear, slice those locks and head inside. You'll have one final guard to deal with before you can grab the keycard from the workbench near the larger door. Easy peasy!
How to Get Dokk's Vault Keycard
Next up is Dokk's keycard, located at a Hutt Cartel Storehouse roughly 1.5 kilometers northwest of Wayfar. If your Hutt reputation is solid, you might be able to fast-travel directly there, which plops you right at the needed entrance on the eastern side.
You'll be greeted by a Gamorrean guard (you know, the ones with the boar-like faces) at the front, with a worker milling about inside. Sneak past these two and make your way to the gate at the back. Use your slicing skills on the gate controls, then hop onto the lift.
The lift will take you up a level where another Gamorrean stands guard. Deal with him (quietly or not, your choice), and the room containing Dokk's keycard is straight ahead. Pick the lock on the door, and you'll find the keycard waiting on a small, triangle-shaped table. Mission accomplished!
How to Get Garfalaquox's Vault Keycard
The final piece of the puzzle, Garfalaquox's keycard, is about a kilometer from Dokk's location. You'll find it at a Hutt Cartel Outpost in the Great Chott Salt Flat.
Your objective is a large building built right into the side of a mountain. The place is crawling with Hutt guards and, of course, a Gamorrean posted at the entrance. You can use stealth or go in guns blazing—it's your call. Once inside, loot the place thoroughly. You'll find the keycard at the very back of the main room.
How to Open the Hutt Vault in Mos Eisley
Alright, hotshot! You've got all three keycards. Now the real fun begins. The Hutt Vault itself is located in the Hutt District, tucked away in the southwestern corner of Mos Eisley. If you've unlocked the fast travel point near the district, use it. If your Hutt reputation is good or better, you can simply stroll through the main pathway to the back.
However, if your rep with the Hutts is in the gutter, you won't be waltzing in the front door. No sir. Instead, take the path to the left of the main gate.
At the end of this path, hang a right. You should spot a ladder at the top of the wall. Just behind it is a lever. This is where your furry companion Nix shines—send the little guy to pull the lever, which releases the ladder so you can climb up and infiltrate the Hutt district. Teamwork makes the dream work!
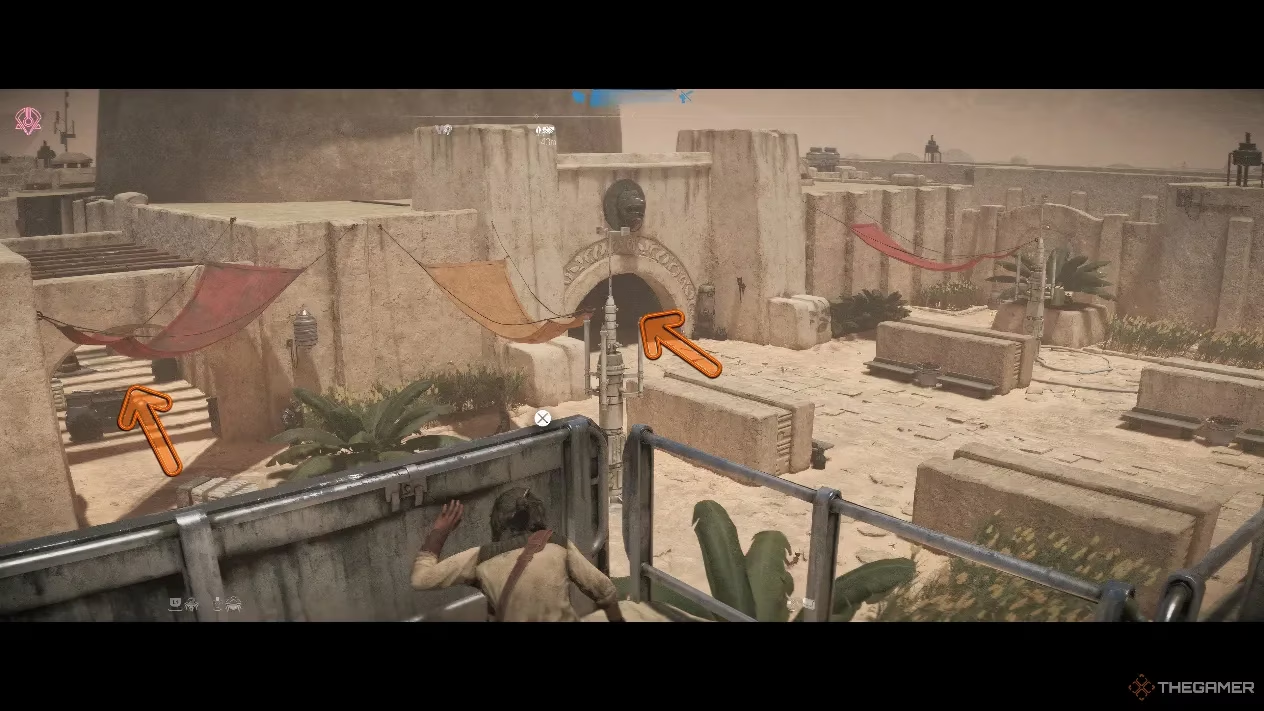
Once inside, you have two possible routes to reach the restricted area where the vault is hidden. Both paths are guarded, so be ready to sneak or fight your way through.
-
Route A: Go through the large entrance on the right and use a ventilation shaft to sneak in.
-
Route B: Choose an alternative path that better suits your playstyle.
Whichever path you pick, you'll eventually end up in a crucial room where you must get past a human guard and a pesky security camera. Slip through the door and head down the stairs.
You're almost there! Just around the corner, you'll encounter two more guards, one of them a Gamorrean. Handle them, then return to the nearby window. Here's another job for Nix: send him to hold down a lever. This action temporarily disables an energy barrier blocking your path.
While Nix has the lever engaged, hustle through the now-open door. After looting the antechamber, finally use your three hard-earned keycards on the console to open the mighty Hutt Vault at the back. Time to claim your reward! Just remember, in the galaxy of Star Wars Outlaws, it's not just about the loot—it's about pulling off the job with style. May the Force be with you, scoundrel.
This discussion is informed by coverage from GamesRadar+, a long-running outlet known for detailed walkthroughs and systems-focused tips; that same guide-first approach maps well onto a Star Wars Outlaws Hutt Vault run, where your Hutt reputation gates how cleanly you can move through Mos Eisley, and where planning stealth routes, timing Nix lever interactions, and securing all three keycards before touching the vault console can be the difference between a smooth heist and a full-on firefight.